
This guide walks you through how to set up the integration between DanDomain Webshop and Heyloyalty. The purpose of the integration is to let you take a data-driven approach to email marketing and marketing automation by using both purchase and behavioral data from your webshop. The guide takes you step by step through the setup – from the necessary preparations to the technical implementation – so you can quickly and easily get started creating more relevant customer experiences and strengthening your customer loyalty.
The value of the integration
If you run a webshop and want to build stronger relationships with your customers – without spending hours on manual work – then this integration is for you. With DanDomain Webshop and Heyloyalty connected, you get access to your customers’ behavior and purchases, which you can use to communicate more relevantly, personally and effectively.
Increased loyalty
When you start working with marketing automation and personalized messaging, you can meet your customers with content that actually matters to them. This creates a better relationship – and ultimately more loyal customers who want to come back.
Improved customer experience
Today, your customers expect relevant and timely messages. With data from your online store, you can automatically send content, offers and information tailored to the individual customer – creating an experience that feels both personal and valuable.
Targeted communication
Instead of sending the same thing to everyone, you can segment your customers and target the right audiences with the right messages. This makes your communication more precise – and far more effective.
Churn prediction and prevention
With insights into your customers’ behavior, you can identify those who are losing interest. This allows you to intervene in time with relevant campaigns and automated flows to retain more customers.
Streamlined processes
Automating your marketing activities saves you time and resources. You’re freed from manual work and can focus on growing your business – while the system makes sure you send the right messages to the right people.
Turn your webshop visitors into loyal customers. With the 2-way integration between Heyloyalty and DanDomain Webshop, you can take a data-driven approach to email marketing and marketing automation – and get better results with less effort.
Before you begin
To make it easier for you, we recommend that you read the frequently asked questions and gather the various documents, IDs, login information, etc. that you will need for the setup. See more below.
Frequently asked questions
Do I need a developer?
No.
How long does it take to finish setting up the integration?
Depending on how well you know Heyloyalty and DanDomain, it probably takes somewhere between 10-30 minutes.
Does the integration retrieve historical data?
Yes.
Do I need access to other systems?
You must have access to Heyloyalty – and your Heyloyalty account must be active.
You must also have access to the DanDomain backend.
What data is imported?
Read the Fields in the integration section at the bottom of this page for the full overview. Basically, all behavioral data and all purchase data from the webshop are included.
Can I segment on data coming through the integration?
Yes. Any data that comes through the integration can be used to segment your future communication. You can also use this data to start and stop your flows.
What you need to set up the integration
You should have Heyloyalty open in one tab.
- A tracking integration. Read more about Tracking here.
- Open the DanDomain backend in another tab.
The integration operates via DanDomain Webshop’s API and Heyloyalty’s tracking database. Read more about Tracking here.
Setting up the integration
With the above preparations in place, you are now ready to set up the integration between DanDomain Webshop and Heyloyalty.
Create API client
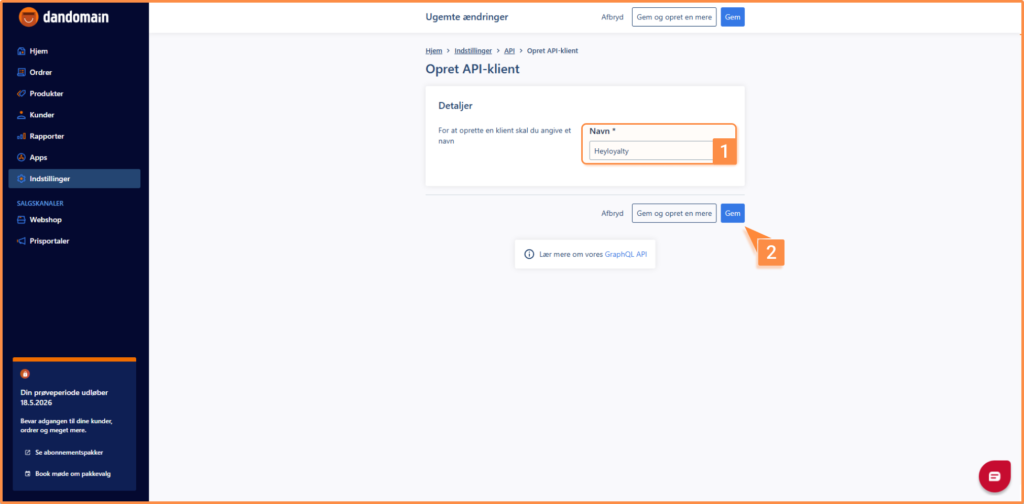
Set up the API in your DanDomain Webshop via Settings → API → Create API client → Enter a name. The name doesn’t matter much and is only for your own use, so you can simply call it Heyloyalty. Finish by clicking Save.
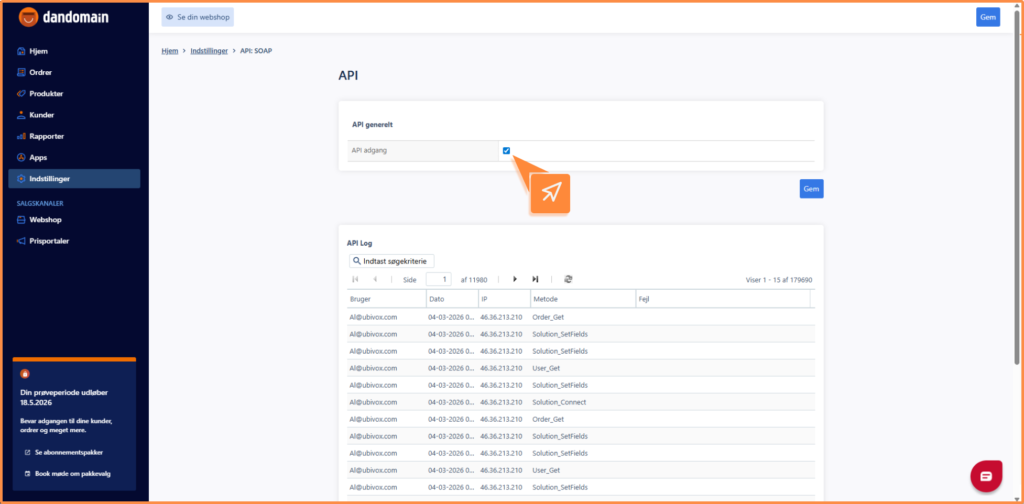
Enable API:SOAP access in your DanDomain Webshop via Settings → API:SOAP → check the box.
Create employee
Use your own user profile or create a new ‘fictitious employee’ (or a dummy user) that is linked to the integration. Please note that if this user is deleted at some point, the integration will stop working until a new employee in DanDomain Webshop is connected to the integration.
Set up or create the employee in your DanDomain Webshop via Settings → Employees → Create employee, and fill in the information. Under Application access, the employee must have access to the API (Has access to the SOAP API).
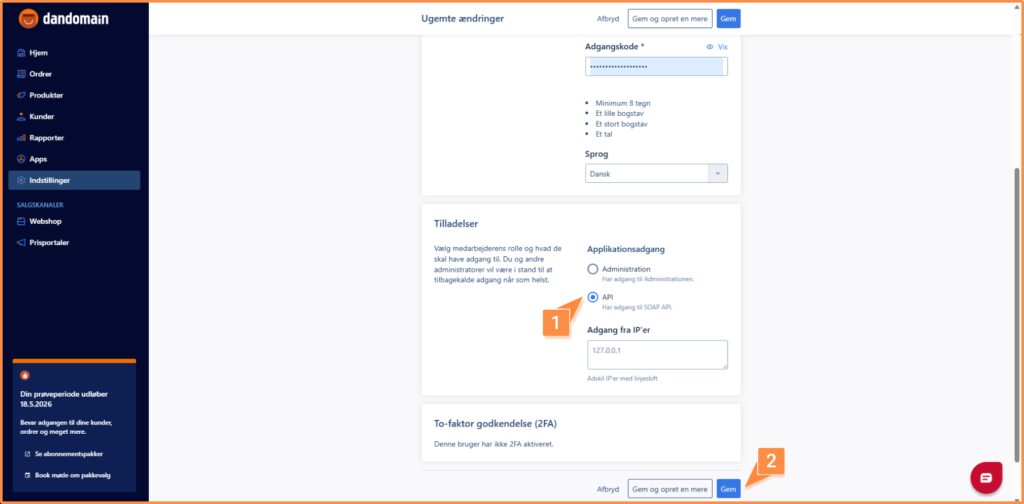
Finish by clicking Save.
Create or use a product feed
The integration automatically downloads your Google Shopping Ads price portal – i.e. your product feed.
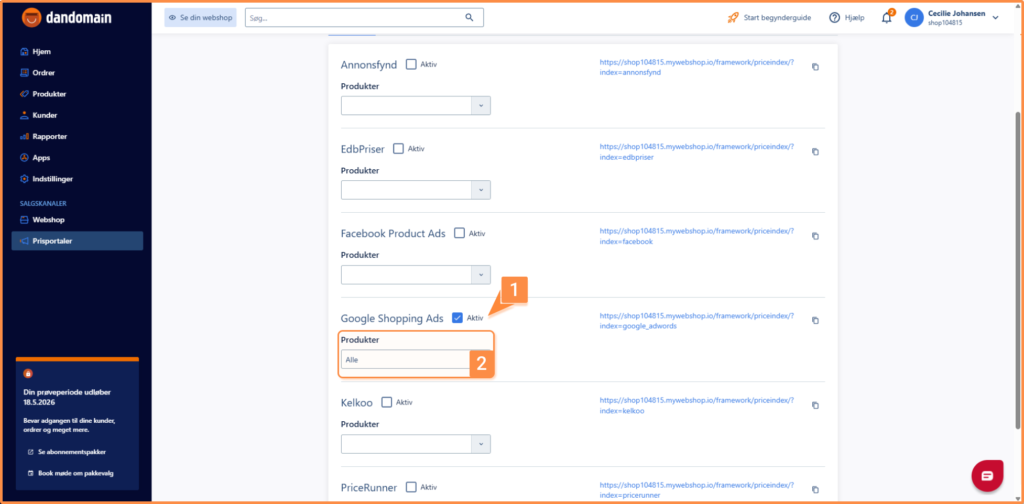
Double-check that this price portal is active via Sales channels → Price portals → Google Shopping Ads. Make sure that Active is checked and that it says all under products. Then save the settings.
Create the integration in Heyloyalty
Now open Heyloyalty.
Integrations → Integrations → Integrate with HostedShop → Set Up Integration
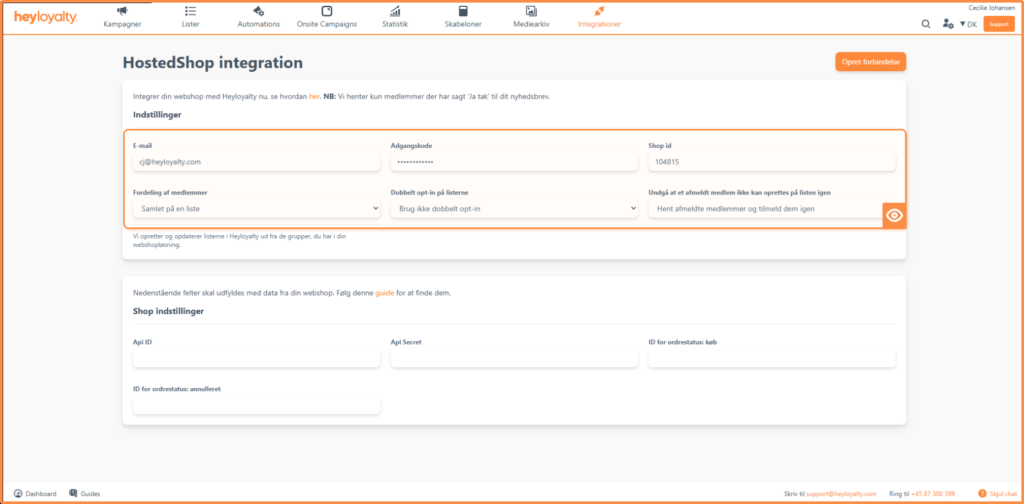
Fill in the information. The Email and Password must be the email and password of the employee you created or used in the Create employee section above.
You will find the shop ID in the top right corner when you are logged in to your DanDomain Webshop backend. An example of a shop ID is shop123456.
We recommend setting Contact distribution to Compiled on one list. This will make it easier for you to manage your members in the future and avoid duplicates.
Leave Double opt-in to the lists set to Do not use double opt-in. You can change this in the list settings afterwards, but for now you need to leave it on Do not use double opt-in, because the integration will automatically retrieve all your members who have signed up for your newsletter.
Also leave Avoid subscribing currently unsubscribed contacts set to Fetch unsubscribed contacts and add them to list, because a customer may have unsubscribed by mistake or may want to hear from you again.
In Shop settings, fill in four fields.
- Api ID and Api Secret.
You can find them in the DanDomain Webshop backend:
Home → Settings → API → Click the name of the API client in the ‘Set up API’ section.
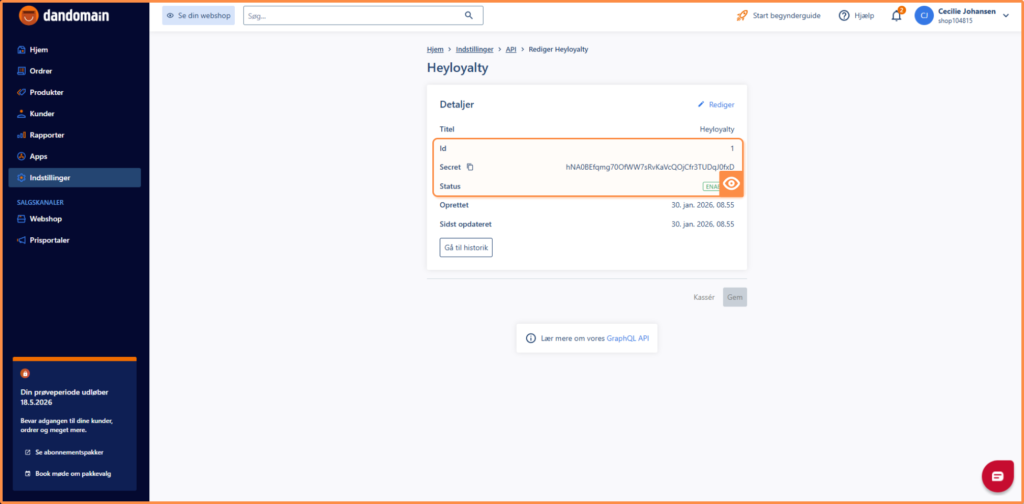
- ID for orderstatus: bought (You can read the default values in the next paragraph, but if you haven’t changed the default settings, you can simply move on to the next step)
- ID for orderstatus: annulled (You can read the default values in the next paragraph, but if you haven’t changed the default settings, you can simply move on to the next item)
The different IDs for order status can be found in DanDomain Webshop here:
Settings → Store settings → Orders → Create and edit order status
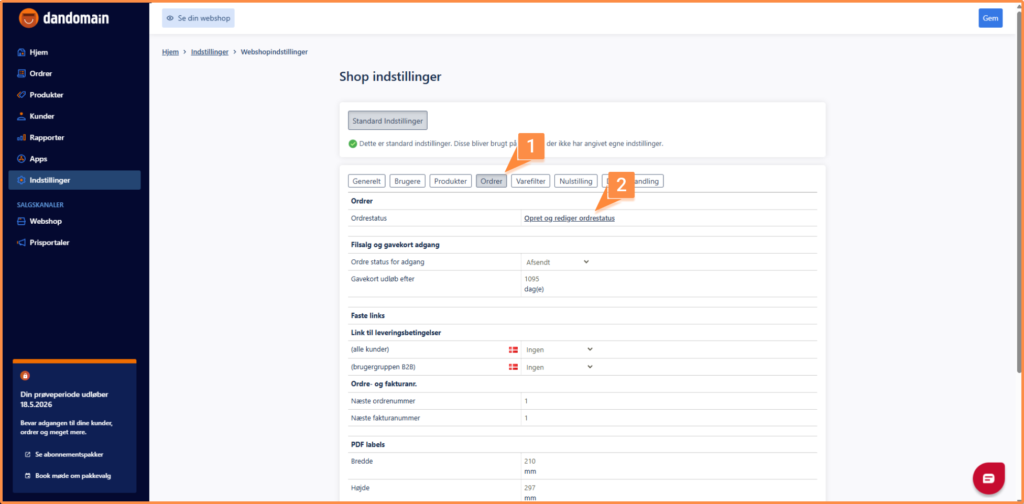
By default, the order statuses for purchases are 1,2,3,4,6,7,8, and the order status for canceled orders is 5.
For purchases, look for the following order statuses: Order received (Ordre modtaget), Processing (Under behandling), Shipped (Afsendt), Ready for pickup (Klar til afhentning), Partially shipped (Delvist afsendt) and Picked up (Afhentet):
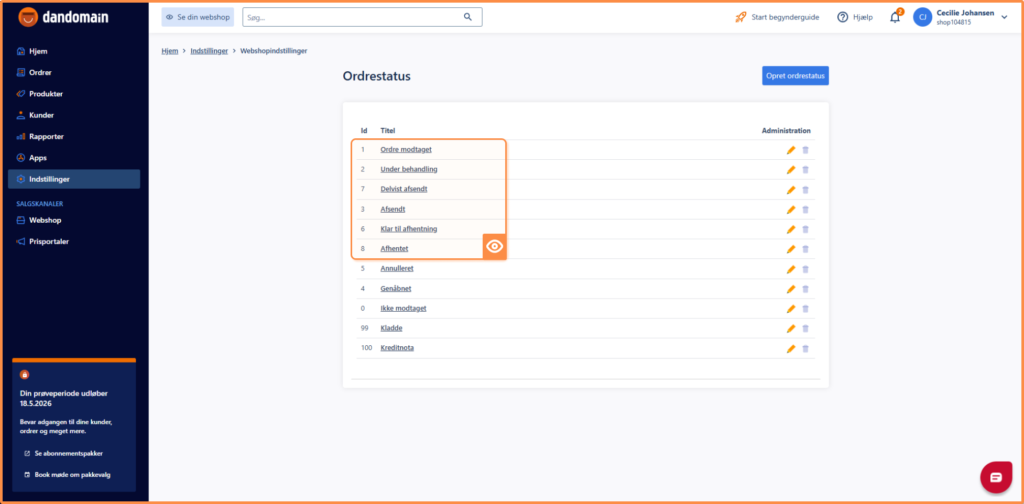
For the canceled order status, look for Canceled, which is 5 in the screenshots above (the default).
This means that the integration page in Heyloyalty will be filled in something like this:
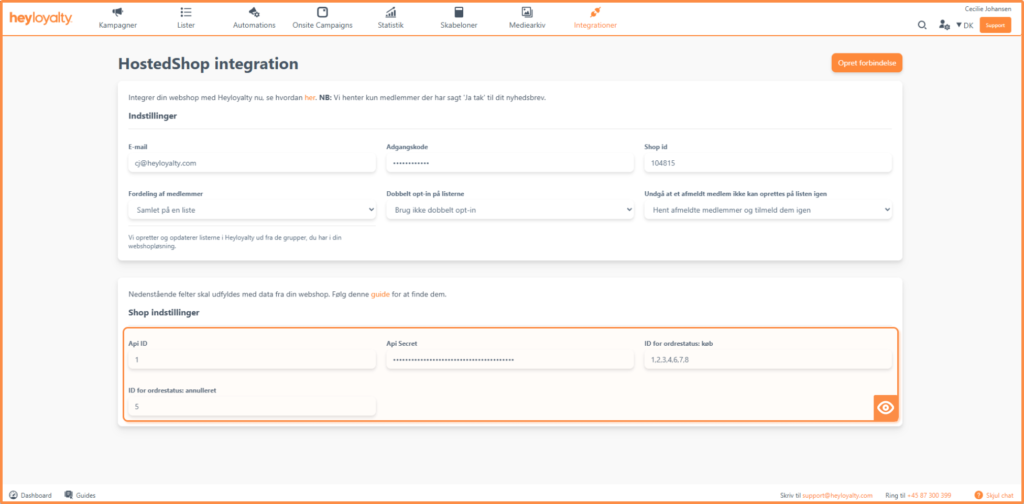
Your integration is now ready and will fetch all future transactions from DanDomain Webshop.
Create tracking in Heyloyalty
Set up Tracking by clicking Integrations → List Integrations → Tracking → Setup Integration → Create new Tracking.
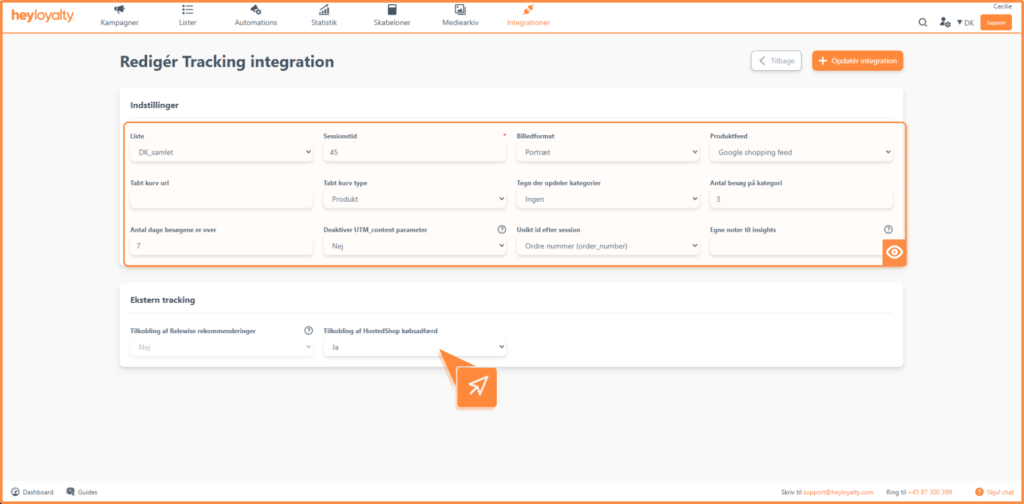
Fill in the fields.
If you need help filling in the fields, read this guide.
Remember to set Connect your Hostedshop transactional data to Yes. You can only do this if you have a Premium license. If you have a Basic license, you need to leave it at No.
Create a script for tracking
Create your tracking script by visiting the https://tracking.heycommerce.dk/gettrackingscript page.
Leave the field “Hvilken webshop har du i dag” (Which webshop do you have today) set to Smartweb.
Select the session time: enter the same number you selected in the previous step. The default is 45.
Next, you need your API key from Heyloyalty. You can find it via Settings → Account Information → API key (copy the entire API key).
Paste the copied API key and click Create tracking script.
A script is now generated. Copy the entire script (including the line break at the top and the indentation).
Implement tracking in DanDomain Webshop
Paste the newly copied script as JavaScript into your DanDomain Webshop backend.
Log in to DanDomain Webshop and go to Sales channels → Online Store → Design → Actions → Insert Javascript → Page content (bottom).
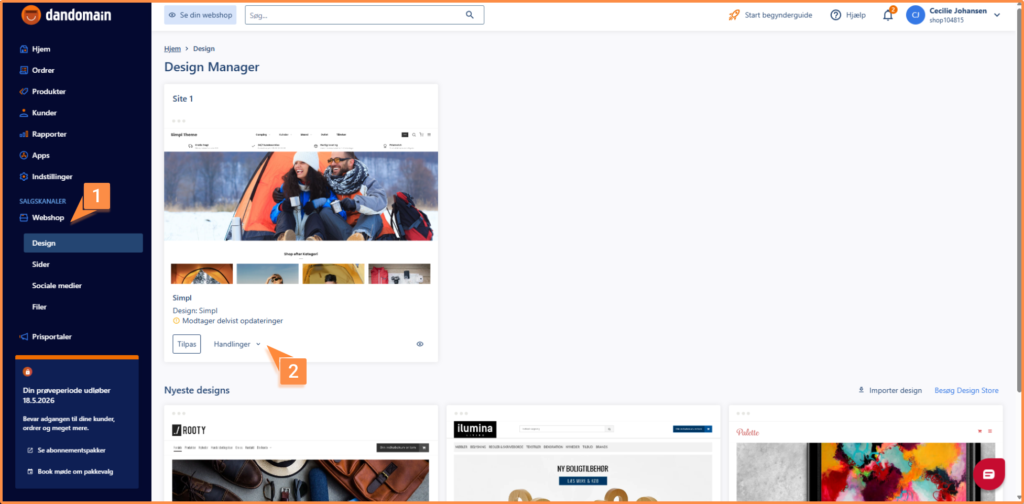
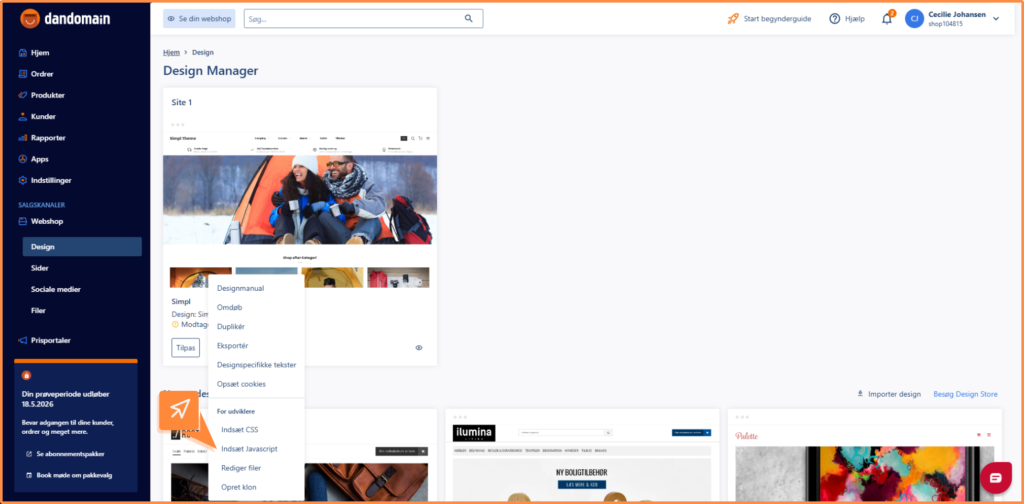
Finish by clicking Save.
Check if the integration is set up correctly
Once you’ve finished setting up the integration, it’s a good idea to check if it works as expected.
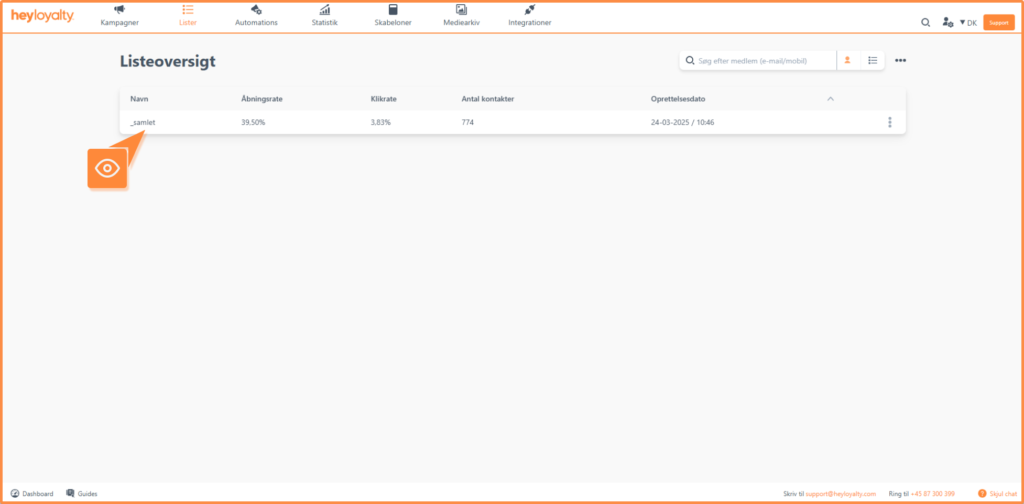
You can start by checking if a list has been created in Heyloyalty. The list will typically be called something like *_total. It can also be called, for example, *DK_samlet if you have multiple language versions of your online store.
If your product feed is mapped correctly, you will be able to insert a product feed when setting up campaigns. Here you will have the opportunity to search for your products directly in Heyloyalty. You can read more about how to insert a product feed here.
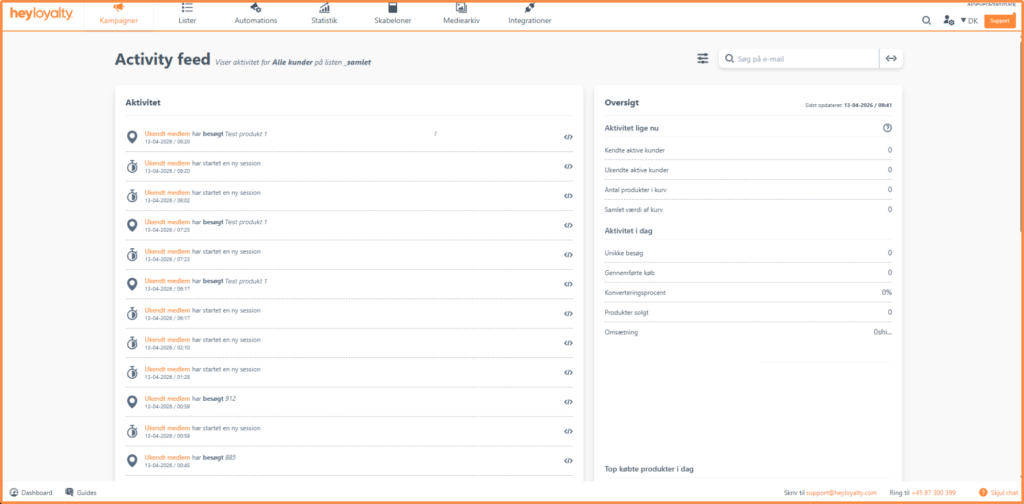
If you have inserted the tracking script on your website, you should also check if behavioral events from your webshop are registered in Heyloyalty. You can see this under Activity feed. Remember to choose the right list.
General information about the integration
Worth knowing about the integration
Once the integration is set up, Heyloyalty fetches all historical purchase data for the members who are created.
If a customer has made four purchases in your webshop but only signs up for the newsletter in connection with the fifth purchase, this person will be created with five orders attached.
Fields in the integration
If you want a complete overview of the fields in the integration, you can find it among the fields on the list you have connected the integration to.
Lists → ⁝ → Edit list. Scroll to the bottom to see all the custom fields on the list that you have mapped as part of the integration. The integration creates the fields Postal number, Customer ID, Customer type and User group.
Through Tracking, you can segment on e.g. last purchase date or purchases of at least x kroner.

If you need information or help that you cannot find here on the guide site, you are always welcome to contact our support!
support@heyloyalty.com