
In this guide, you’ll learn what it takes to use the Amero/FlexPOS integration and how to set it up in Heyloyalty.
If you want the Amero/FlexPOS integration, contact Heyloyalty at support@heyloyalty.com, as it is a paid integration.
Setup options with the Amero/FlexPOS integration
With the integration activated, you can easily set up automations that target customers when they make a purchase or book an event.
Examples of automations
Here are some examples of automations you can set up:
- Welcome flow
- Updated profile details
- Has purchased
- Has booked
- Has booked more than X times within Y period
- Has booked more than X tickets in the same order
- Has booked an event, then added dining in a new order
The above lists are just examples.
Examples of segmentation options
For campaigns and automations, you can segment on all the data retrieved through the integration. If you have mapped additional fields yourself, these are of course also available.
- Booked a specific event
- Purchased a specific product
- Booked on a specific date
- Booked for an aggregated total amount over Y period
- Has membership
- Has booked online
- Has booked/purchased X tickets/products
- Has booked/purchased X tickets/products over Y period
- Has booked a specific zone, seat, row or product
The above are just examples of segmentation and automations that can be built with the Amero/FlexPOS integration.
Setting up the Amero/FlexPOS integration
To set up the Amero/FlexPOS integration, you need an account with a Premium or Premium+ license. In addition, you must have an active list with a tracking integration set up on it. Read how to set up a list and how to set up a tracking integration.
If you already had a Heyloyalty account before setting up the Amero/FlexPOS integration, we recommend that you create a new list and tracking integration for Amero/FlexPOS to keep the history of your existing list.
To create an Amero/FlexPOS integration, go to “Integrations → List Integrations”, find Amero/FlexPOS and click “set up”. If you are setting up your first Amero/FlexPOS integration, the page looks like this:
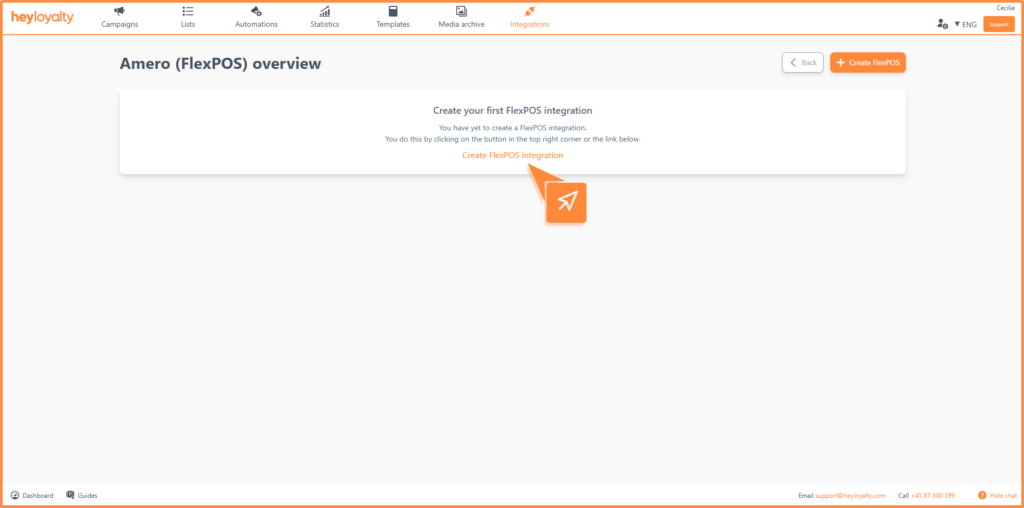
On the integration page, you must at least go through the fields under settings to start transferring members and products.
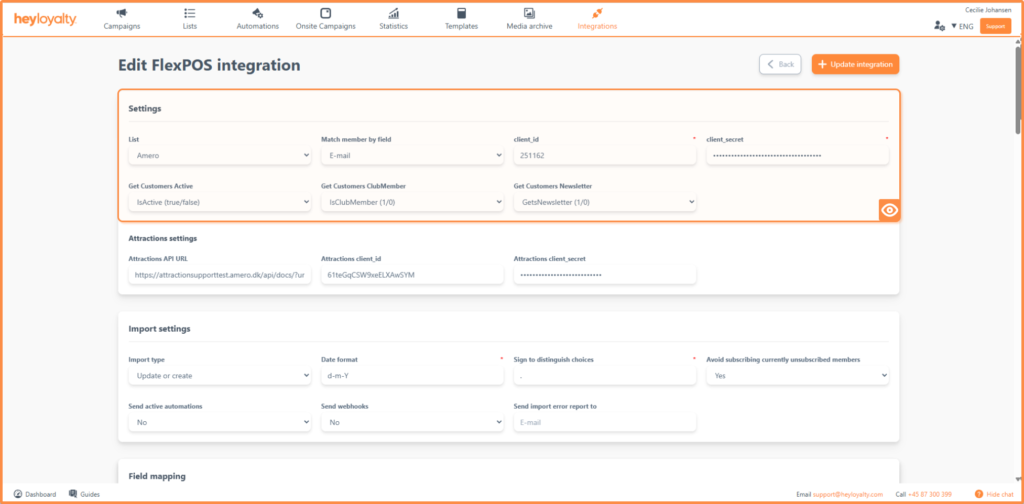
Under Settings, you need to configure the following:
- List:
Select the Heyloyalty list that your members from Amero/FlexPOS should be sent to. - Match contact by field:
Select which field your members should be recognized by (email or mobile).
- Client_id:
This provides access to your Amero/FlexPOS solution*.
- Client_secret:
API secret from Amero/FlexPOS*.
- The three settings below determine which members to retrieve from Amero/FlexPOS. By default, the system is set up to retrieve all members.
- Which contacts should be retrieved?
Change this setting to “Active contacts only” if you only want to retrieve active customers.
- Which club members should be retrieved?
By default, both club members and contacts who are not club members are retrieved. Change this setting if you only want to retrieve club members.
- Which newsletter subscriptions should be retrieved?
Change this setting to “Email permission” if you only want to retrieve members who have agreed to receive newsletters.
Unfortunately, we cannot configure these three settings for you, as the contacts you retrieve vary from user to user. We can work with you to find the correct settings for your account.
Initial import
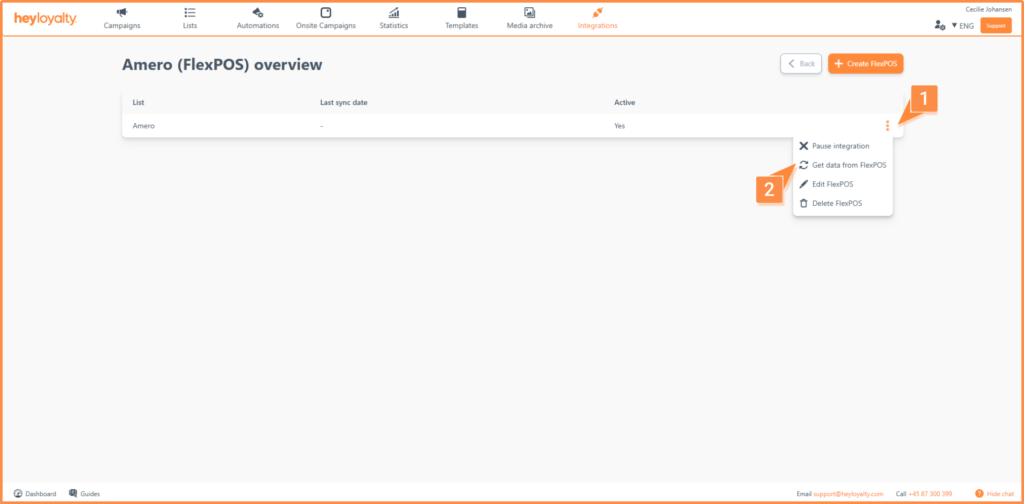
Once the integration is set up, you can retrieve historical data. You do this from the overview page: click the three dots (•••) next to the integration and select “Get data from FlexPOS”.
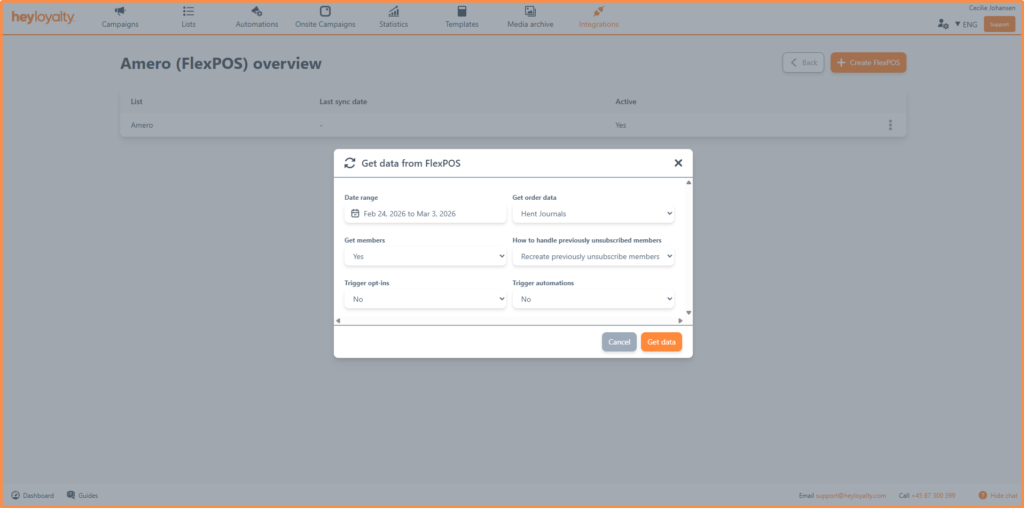
When you open the import modal, you will see 6 options. These can override the general integration settings for an initial/manual import:
- Date range:
The start and end dates of the data you want to import. (You can retrieve data up to one year back.)
- Get order data:
Do you want to import tracking data this time? You can choose, for example, journals, tickets or no data.
- Get contacts:
Do you want to import member data this time?
- How to handle previously unsubscribed contacts:
If members in the import have previously unsubscribed, you can choose whether to create them.
- Trigger opt-ins:
Do you want your members to confirm their registration through a confirmation email before they are created on the list?
- Trigger automations:
If you want to send welcome emails and automations that are directly related to the member’s registration, the update of a field, etc., set this to yes.
To confirm that data from Amero/FlexPOS is being retrieved into Heyloyalty, check whether contacts have been added to your list under the Lists menu item. You can also check the activity feed under the statistics menu item to see whether events have been added to the list.
Advanced setup and customization
Advanced settings
On the integration page, you can set advanced settings for your integration.
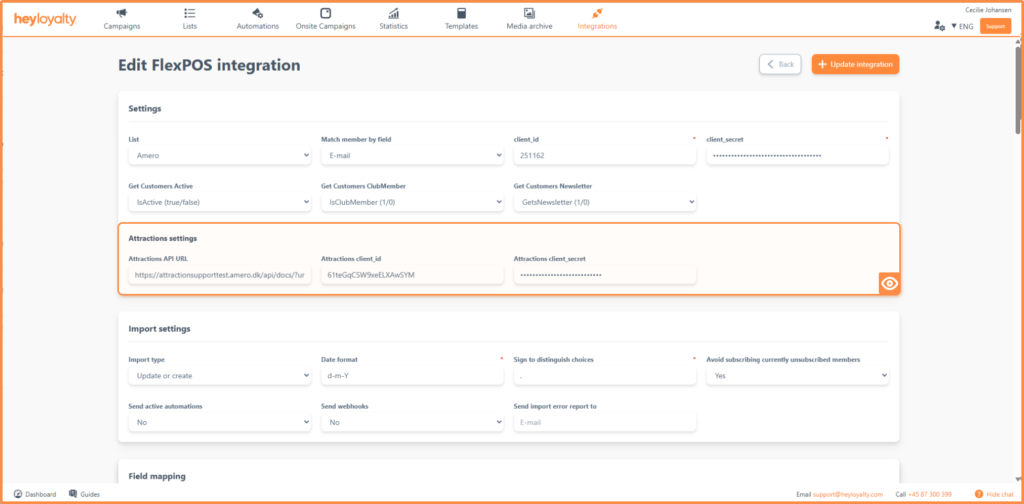
If you sell tickets and/or memberships in Amero/FlexPOS, you must enter the following under Attractions settings: Attraction API url, Attraction Client_id and Attraction Client_secret. You can get this information by contacting your FlexPOS consultant or their support:
If you have additional requirements for the regular import of members, which runs every five minutes, you can set them under Import settings. Here you can control how members are created and updated:
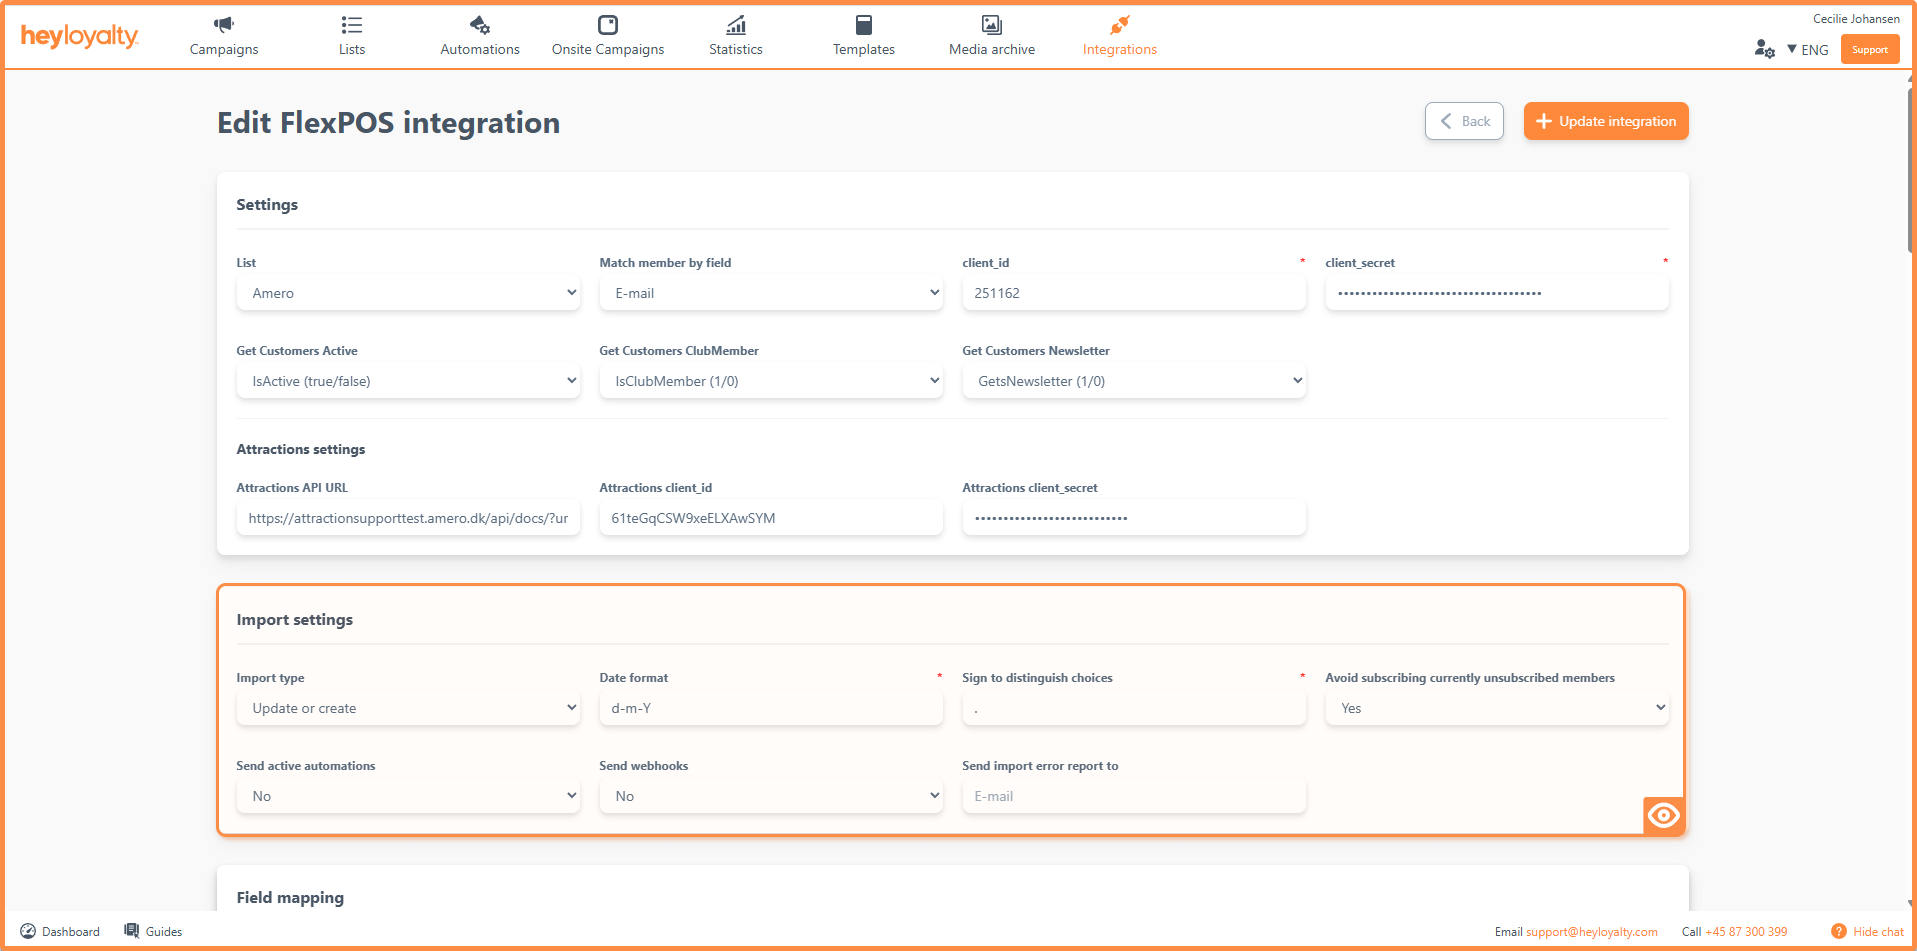
- Import type:
Here you must choose how the contacts from Amero/FlexPOS should be created in Heyloyalty.
- Date format:
If you use a different setup or date format, you can change it here.
The date format in the field matches the one Amero/FlexPOS delivers as standard.
- Sign to distinguish choices:
This defines how your data is divided. If you have nested data (arrays), you can retrieve data by using a period or similar, e.g.
”cards” {
”Cardnumber”: 1234,
”Cardname”: ”Pension” }
In this case, you can map fields below by using a period: cards.Cardnumber
This combination retrieves the card number.
- Avoid subscribing currently unsubscribed contacts:
By default, members are created if they do not already exist on the list. If you do not want members who previously unsubscribed from your list to be created again, change this option to No.
- Send active automations:
If you want automations (welcome emails) to be sent when a member is created on the list, change this to Yes.
- Send webhooks:
If you want creation and updating from Amero/FlexPOS to trigger a webhook, you can activate the function here (this is relevant if you have a CRM system or similar that should be notified). If you select “No”, Heyloyalty will not send webhooks when we receive data from Amero/FlexPOS.
- Send import error report to:
If the import from Amero/FlexPOS fails, this function sends an error message, including a list of the members, to your email.
Field mapping
By default, we map a number of fields on customers, tickets and journals. You can see the field mapping at the bottom of the integration page. If there are fields that you do not use, or that are not active on your list or tracking, you can remove them in Heyloyalty’s field mapping.
- Customer fieldmapping:
We retrieve member data from “Customers” in Amero/FlexPOS. You will find these fields on the list in Heyloyalty.
- Journal and Tickets fieldmapping:
We retrieve tracking data from Journal and Tickets in Amero/FlexPOS. You can find the data in the activity feed under statistics.
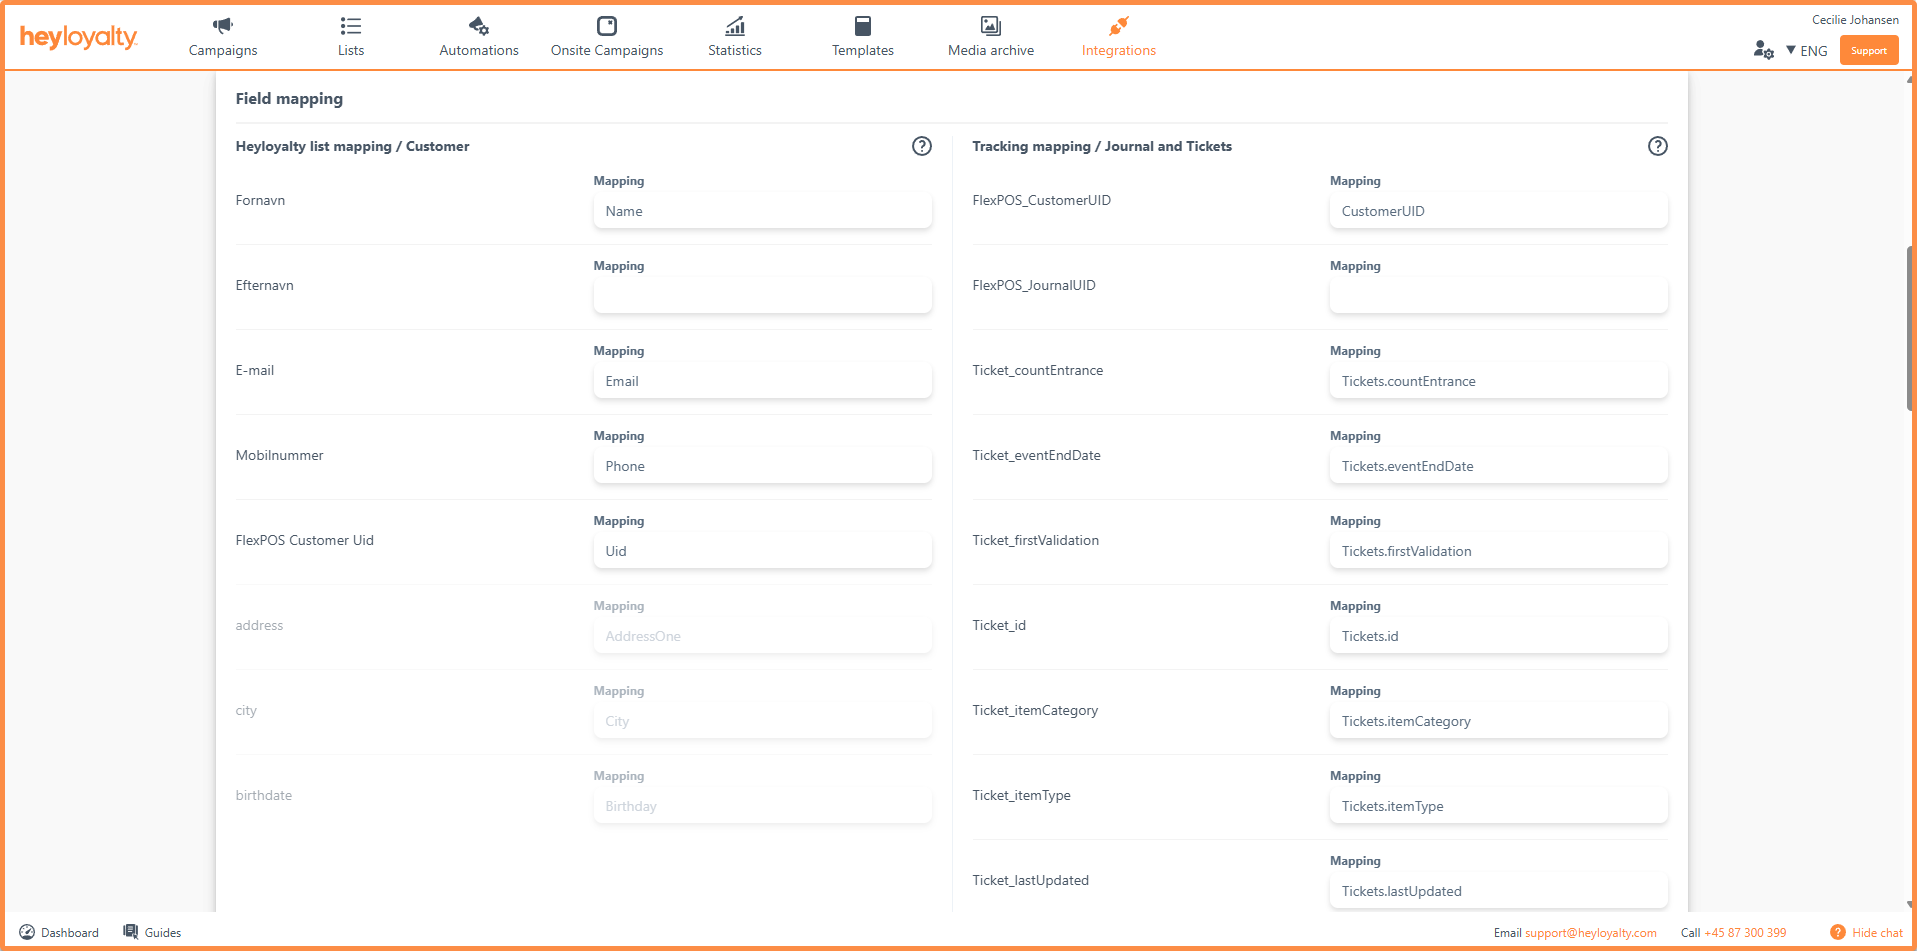
If you want to add more data fields than those already mapped on the integration page, you must first make sure that the data is available in the Amero/FlexPOS API endpoints before it can be mapped in Heyloyalty. These extra data fields can then be linked to the fields displayed under the field mapping on the integration page.
Summary of the Amero/FlexPOS integration
You now have the foundation of your Amero/FlexPOS integration in place. A list of all FlexPOS members has been created, and it is updated continuously and automatically through the import – at the same time, purchases made via Amero/FlexPOS are tracked.
This means that you are ready to send campaigns to your subscribers! Here you can read how to set up a campaign. Remember that you can create segments so that your campaigns are targeted specifically at your FlexPOS subscribers.
As an extra bonus, you can also build a flow that automatically sends emails based on FlexPOS purchases – completely without any manual work.

If you need information or help that you cannot find here on the guide site, you are always welcome to contact our support!
support@heyloyalty.com