
Here’s a guide to what you need to be aware of when integrating Heyloyalty with Billetten. You’ll also get a description of what needs to be set up for the integration to work correctly, so you can use it to send newsletters to your members.
To use the Billetten integration, you must have a Premium or Premium+ account.
Setting up the integration for Billetten
Heyloyalty does not set up the integration between Billetten and Heyloyalty. Billetten does. If your site runs on a full-service solution, Billetten’s integration will ensure that contacts are transferred to Heyloyalty and that tracking data can be seen in the activity feed in Heyloyalty. If you have questions about the Billetten integration, you can contact them here: service@billetten.dk
However, there are some things that you, as a customer, should consider before the integration is set up. You can read more about them below.
Permission fields on the contact
All customers who make a purchase via Billetten will by default be created as contacts in Heyloyalty – even if they have not said “yes” to receiving newsletters. You must therefore decide what permissions the various customers/members should have.
When you are in Billetten’s checkout, you will see two permissions, which are displayed as follows:
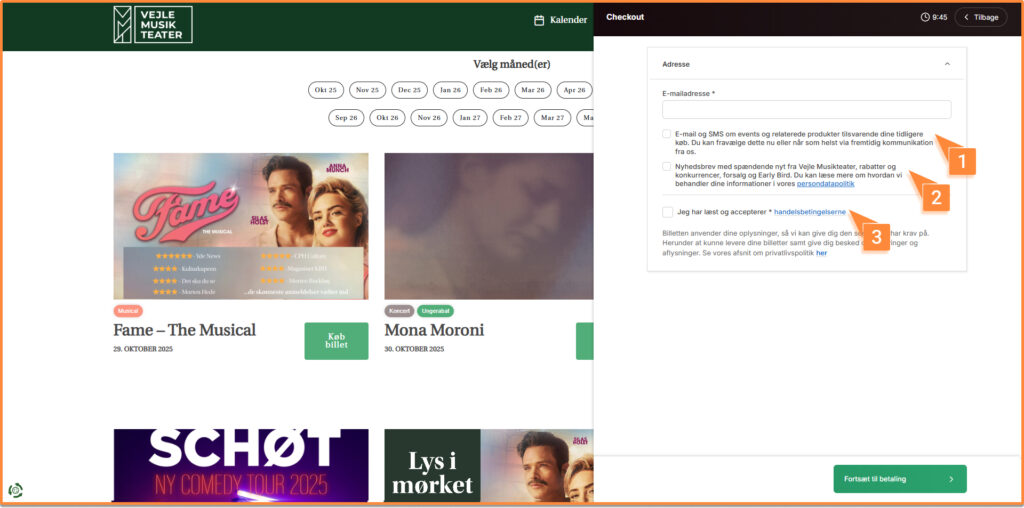
We recommend dividing the permissions as follows:
- Point 1: Can be called 10_2. Here, the buyer gives the email sender permission to send emails and SMS messages about products related to the customer’s purchase. As an email sender, you choose whether the integration should transfer contacts who have given 10_2 permission.
- Point 2: Can be called consent_email. Here, the buyer gives the email sender permission to send all newsletters to the recipient.
- Point 3: Here, the buyer only accepts the terms and conditions. They will still be transferred to Heyloyalty, but without any permission fields.
You decide which permissions should remain in Heyloyalty. If there are any permissions you do not want, you must create a flow with a member action that deletes the contacts.
Setup in Heyloyalty
List and permission fields
As mentioned, Billetten sets up the integration with Heyloyalty. However, various elements must still be set up in Heyloyalty in order for us to receive the data from the integration.
If you do not have a list, you must create one in Heyloyalty. If you already have a list with contacts, simply pass this information on to Billetten so they know which list the contacts should be on.
In the list, you must create the permission fields here:
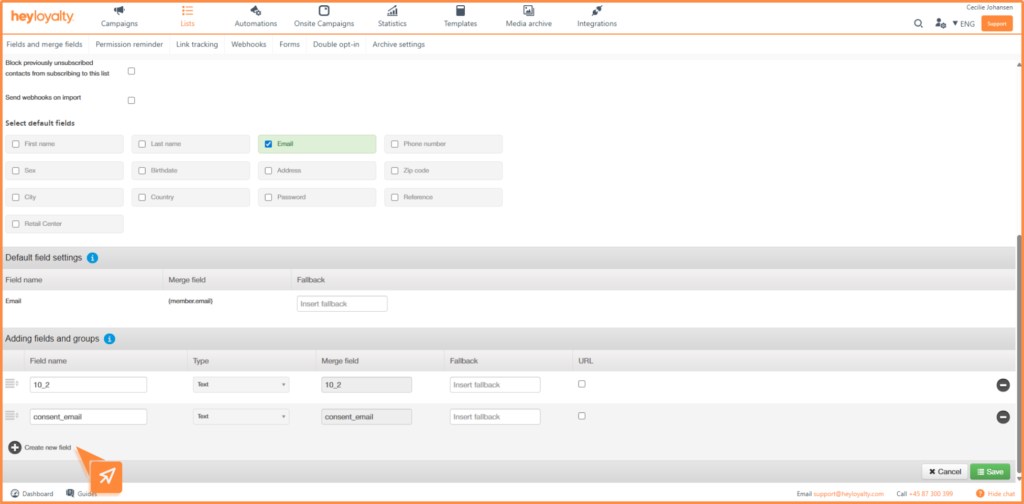
The fields must be created as text fields, and you can use the names we recommended in the points above.
Once the fields have been created, the contacts can be transferred to the Heyloyalty list with the associated fields. You can then decide what should happen with the different permissions.
Unsubscribing members
There are two ways you can unsubscribe your members.
- Full unsubscribe:
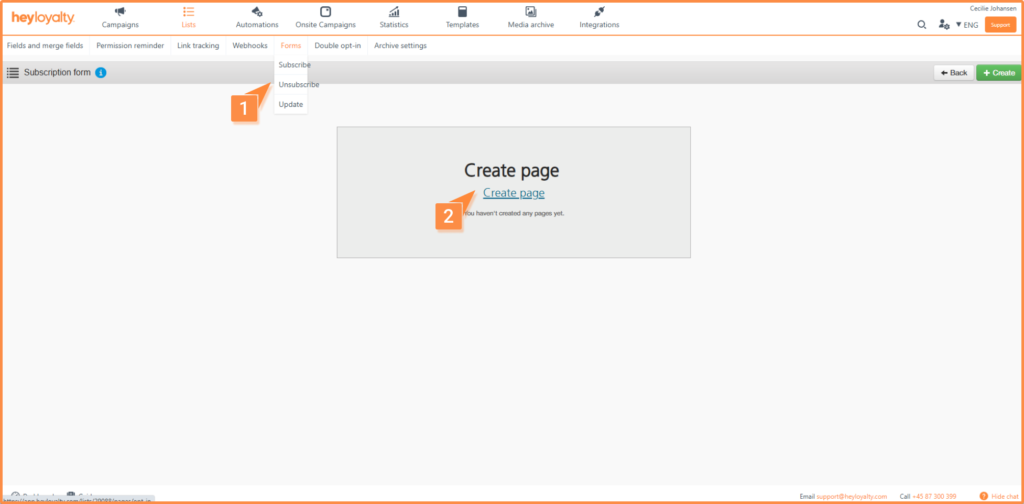
If you want the members to be completely unsubscribed, you must use our unsubscribe form. You can find it here:
Lists → Edit list → Forms → Unsubscribe.
- Partial unsubscribe:
If you would like to be able to send emails to contacts with 10_2 consent even if they have unsubscribed from newsletters, you can do that too. In that case, you must set up an update form where you insert the fields 10_2 consent and consent_email. The form is created in the same place as the unsubscribe form, but you must select Update instead of Unsubscribe.
Tracking behavior and product feed
To insert your products into your campaigns or flows, you need to set up a product feed, which will also be used for your tracking integration. You can read how to create a product feed here.
If you would like to collect tracking data on your contacts’ behavior, you need to set up a tracking integration. You can read how to set up the tracking integration here. The tracking ID that is created in your tracking integration must be sent to Billetten, as they will need it.
Tracking records the following behavior: sessions, visits, added to cart and purchase events. These events can be seen in Heyloyalty’s Activity Feed, where you can follow users’ behavior on your webshop. You can find the Activity Feed under Statistics → Activity Feed.
Purchase behavior
To give a better overview of how the purchase event works in Heyloyalty, here is a brief explanation:
Purchase behavior is recorded in the Activity Feed at the item level. This means that if a customer – let’s call her customer A – buys five tickets for the same performance, the system will register five separate item lines, one for each seat.
In the Activity Feed, you will therefore be able to see five lines of purchase data for customer A.
Behind the scenes, however, Heyloyalty automatically combines these five item lines into a single order.
This means that:
- It is perfectly possible to create a segment based on how many tickets a customer has purchased.
- If, on the other hand, you create a segment based on whether the customer has made a purchase, customer A will only appear once in the segment – not five times.
If customer A cancels one of her tickets, the associated item line will automatically be removed from Heyloyalty. In the Activity Feed, you will therefore only see four item lines for this customer afterwards.
Pairing event
In Heyloyalty, we work with known members. A known member is a member who can be found on a list in Heyloyalty, has accepted cookies and has gone through a pairing event.
The first time an event is registered for a Billetten customer, an extra event is sent via the tracking script. This extra event ensures that Heyloyalty can connect (“pair”) data correctly between the website and the Heyloyalty contact.
The pairing event is triggered when the user logs in to the website or when the buyer clicks the “Continue to payment” button. In addition, the user must have accepted cookies in order for the pairing to succeed.
You are now ready to use Heyloyalty
Once the integration with Billetten is set up, you have created a solid foundation for communicating purposefully and effectively with your customers.
All your contacts and their behavior are now automatically transferred to Heyloyalty, which gives you a unique opportunity to work strategically with your email marketing.
To get the most out of the integration, we recommend that you:
- Segment your recipients based on their purchases, behavior and permissions – so you always reach the right people with the right messages.
- Set up automatic flows that follow the customer’s journey – e.g. welcome flows, follow-ups on purchases or reminders of upcoming events.
- Actively use tracking data to understand how your customers interact with your campaigns and your website, so you can continuously optimize communication.
- Test and adjust your campaigns so that you constantly improve relevance, open rates and conversions.
Once everything is set up, you can send campaigns and automated messages that hit the mark – both in timing and content – with just a few clicks. You are now ready to build relationships, engagement and more repeat purchases.

If you need information or help that you cannot find here on the guide site, you are always welcome to contact our support!
support@heyloyalty.com