
Import contacts
When importing contacts into Heyloyalty, first make sure you have the contacts in a .csv file in UTF-8 format (if the file is not in UTF-8 format, characters such as Æ, Ø and Å will not be imported correctly). The actual delimiter is not important, but make sure the file format is .csv. A delimiter is the character used to divide the information in the file and is very often either a comma (,) or a semicolon (;).
In addition, the file must follow these rules:
- Maximum file size: 10 MB.
- If your list does not allow duplicates, check that the import file does not contain the same “unique key” more than once. If email is the field that identifies the contact, the same email address may only appear once in the file.
- Some data fields must contain data in a specific format:
- Sex: The field must contain male/female.
- Yes/No field: The field must contain yes/no.
- Country: Use a country code in ISO 3166-1 alpha-2 format. For Denmark, it is DK. See the country codes here.
- Multiple-choice field / Store: The field can be empty or contain one or more of the options created on the list.
The options must be spelled exactly as on the list, including upper and lower case.
If more than one option is selected, separate them with a comma or a vertical bar (pipe). Do not use the same character as your delimiter.
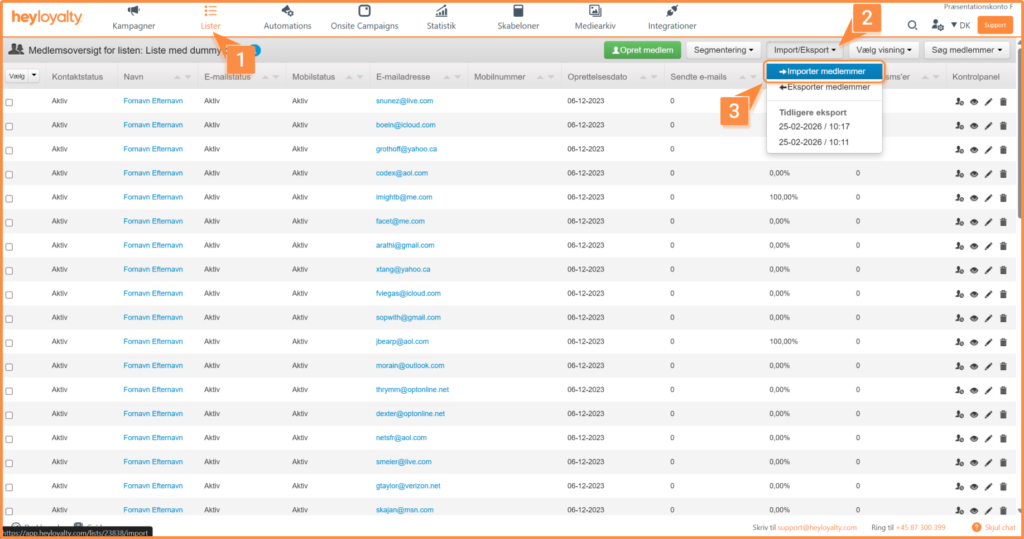
To import the contacts, go to the list you want to import them into by clicking Lists → select the relevant list → Import/Export → Import contacts.
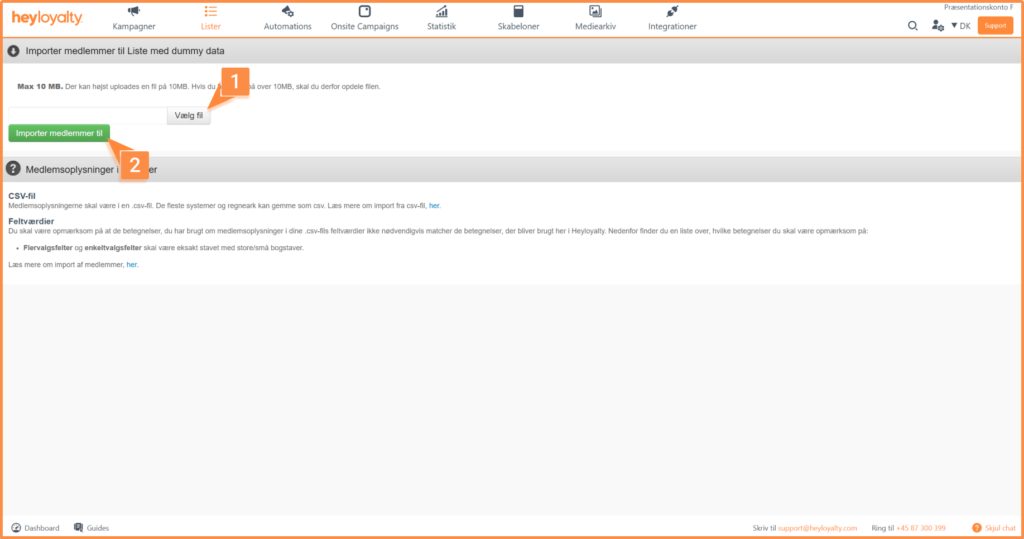
Then click Choose file and locate the file on your computer before clicking Import file.
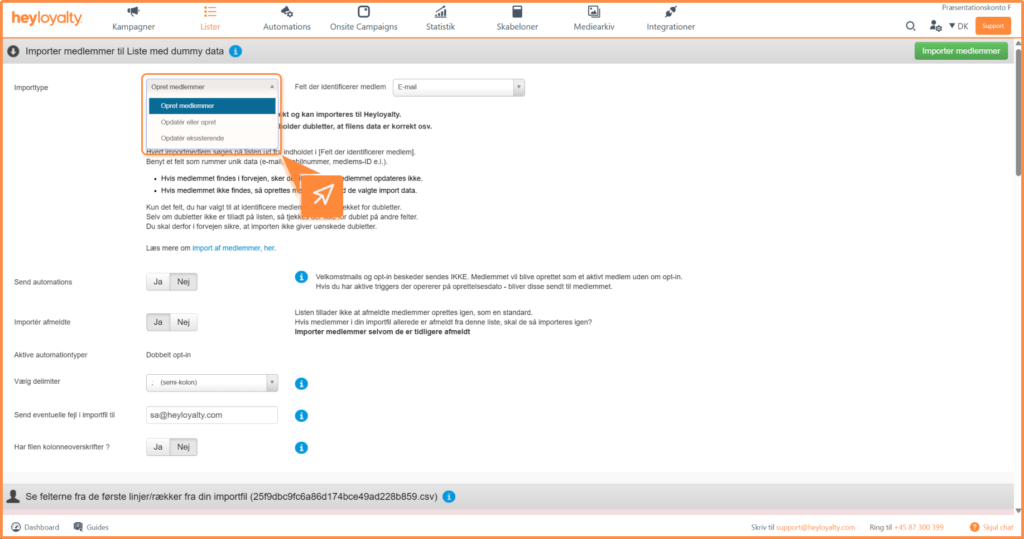
Now choose the Import type:
- Create contacts: New contacts are created, and the contacts in the file that are already on your list are ignored. Those contacts are therefore not updated with the data in the file.
- Update existing: The contacts you already have on the list are updated. No new contacts are created on the list, even if there are new contacts in the file you’re importing.
- Update or create: New contacts are created, and the contacts you already have on the list are updated with data from the file you import.
- If your list allows duplicates, you also get the option Create contacts without duplicate check. New contacts are created, including duplicates. This means that if the import file contains the same contact more than once, a new duplicate is created each time. (We do not recommend this, as the contact’s email or phone number is then not unique, which can make it hard to determine who to send to.)
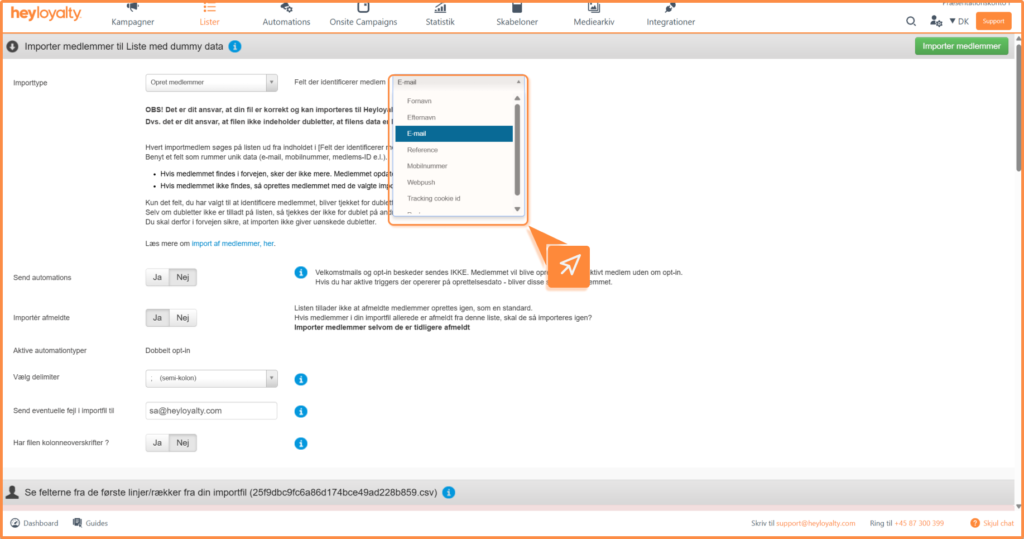
Then choose the field that should identify the members. It should be a field that is unique to each contact, which is why you’ll often choose either email or mobile number here.
Now decide on Send automations, i.e., whether automations should be sent to the contacts you create as part of this import. There’s no right or wrong answer here, but read the help text and decide whether anything should be sent or not.
The same applies to Import unsubscribed. However, the default here is to import the contacts again.
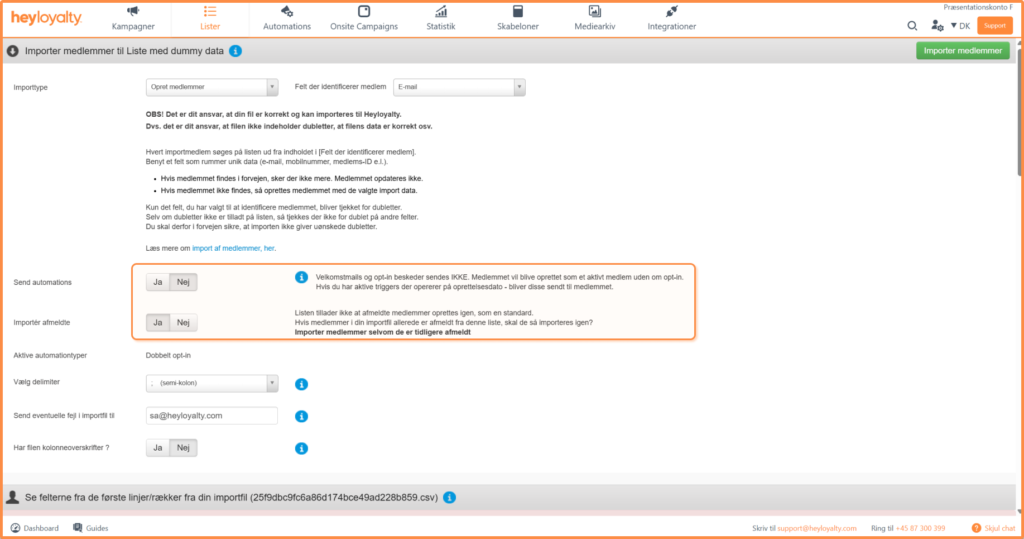
Under Select delimiter, choose the character that separates the columns in your file. If you haven’t deliberately edited your import file, you will often need to choose the semicolon here.
You’ll know you’ve chosen the right delimiter when, further down the page, you get a row for each column in your import file:
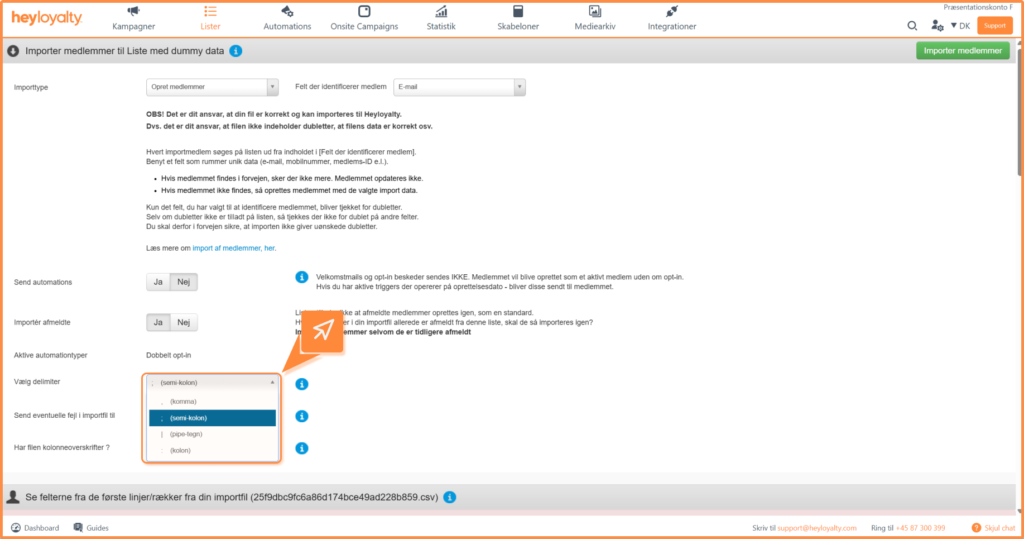
If your columns have headers, make sure they are not imported, otherwise you will get an import error on that line. You do this by setting Does the file have column headers? to Yes.
This row of fields is also the final step in your contact import.
Here, you select which data fields from the file the import should handle. For example, for the column with first names, you change the dropdown from Choose field to First name. This way, you map the data fields from the file to fields on your list in Heyloyalty. If a column in the import file should not be imported, leave it at Choose field.
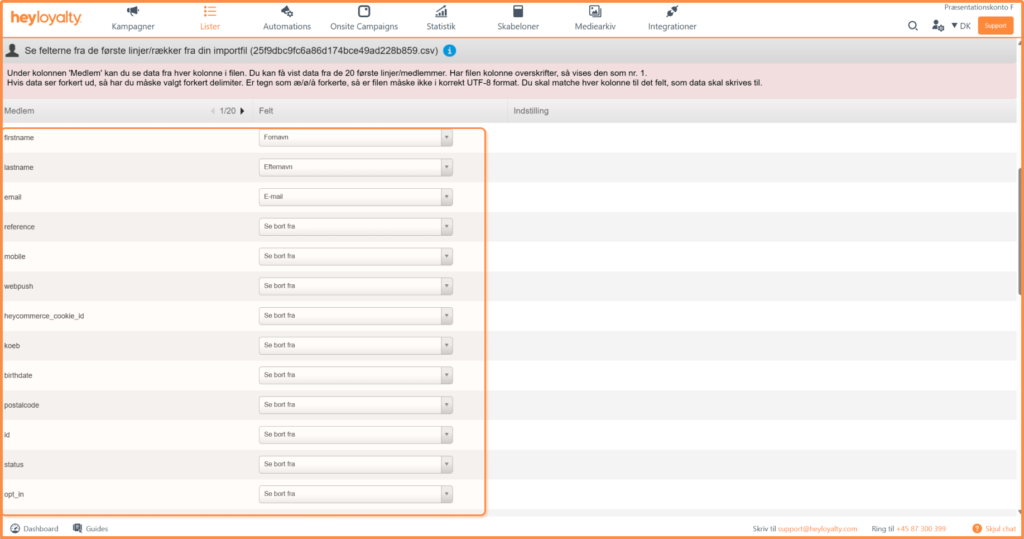
When all the desired fields have been mapped, click Import contacts.
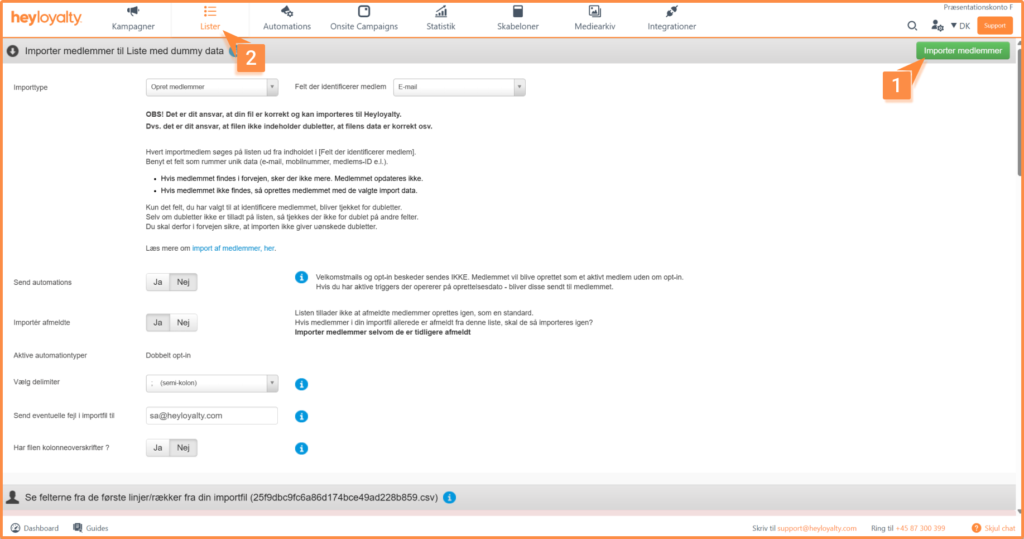
Wait a moment and click the menu item Lists. You can now see that more contacts have been added to your list and/or that the contacts have been updated with data from your import file.
Handling import errors
If errors occur, you receive an import_errors.csv file at the email address you entered under Send any errors in the import file to. The file contains information about the contacts that were not imported and which errors occurred.
Typical errors are:
- A column contains data that does not match the type of the selected list field (e.g., text in a number field).
- An email address is missing the @.
- A mobile number contains letters.
- There are duplicates in your file.
You can then decide whether these contacts should be corrected and imported again.
Export contacts
To export your contacts, click the list you want to export the contacts from, and then select Import/Export → Export contacts.
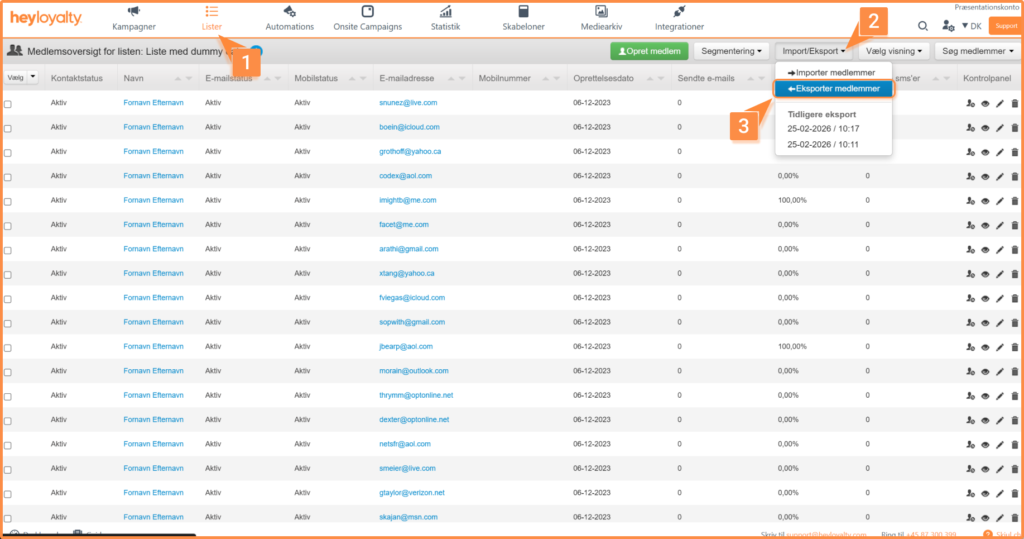
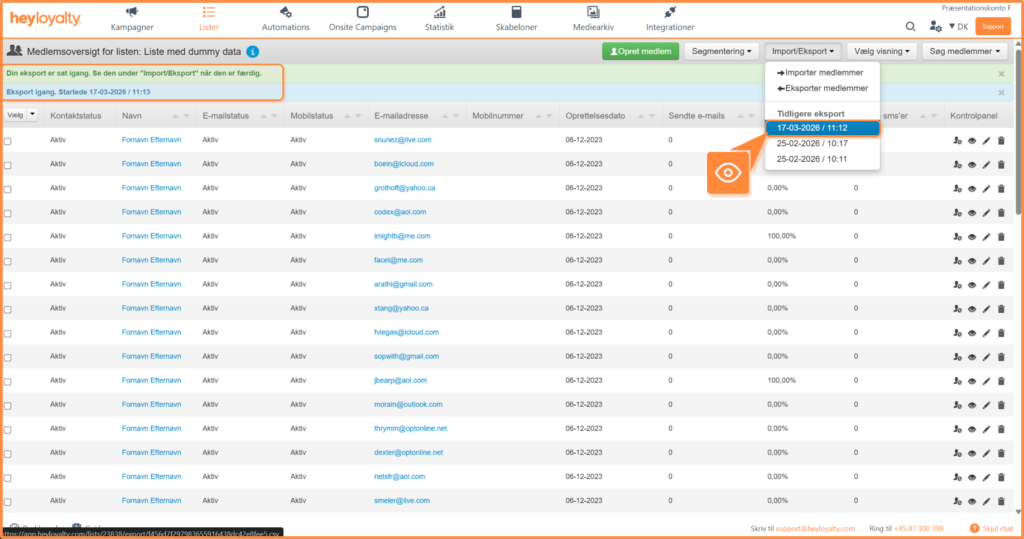
Now wait a moment and refresh the page. Once the contacts have been exported, you’ll be able to download the file by clicking the relevant file under Previous export, which you can find by clicking Import/Export.
The translations are as follows:
- First name = firstname
- Last name = lastname
- Email = email
- Phone number = mobile
- Sex = sex
- Birthdate = birthdate
- Address = address
- Zip code = postalcode
- City = city
- Country = country
- Reference = reference
- Store = shop
- Custom fields are exported with the selected field name.
Specify which contacts to export
Here, select the contacts you want to export by checking the boxes next to each entry. You can also select a segment from the list and then click Choose, which is located at the top of the checkbox column in the contact overview.
Next, scroll down to the bottom and select Action for multiple contacts. Here, select Export selected. Once the export is complete, you can locate the export file using the same method described in the section above.

If you need information or help that you cannot find here on the guide site, you are always welcome to contact our support!
support@heyloyalty.com